Kali ini, untuk kartu ulang tahun Emily, saya membuat kartu dengan dasar concertina atau berbentuk mirip akordion. Saya ingin mengisinya dengan harapan-harapan saya dan bagaimana dia di mata saya. Beberapa hal yang Emily sukai, saya pakai di dalam kartunya, biola dan macaroon. Kebetulan sewaktu kami jalan-jalan ke New York, kami mampi rke toko kertas Paper Source. Di situ saya melihat ada sticker berupa macaroon dan langsung membelinya untuk kartu Emily. Kertas dasar kartunya sendiri adalah karton biasa, berwarna kuning. Nuansa warna yang saya padukan adalah merah muda, hijau, dan hijau. Ada empat halaman di kartunya, dengan bonus halaman terakhir, khusus untuk memberikan pernyataan kartu itu untuk siapa. Kartu ini saya ikutkan kegiatan Prakarya Kertas yang saya prakarsai lewat group Prakarya Kertas di Facebook.
Showing posts with label handmade album. Show all posts
Monday, April 8, 2013
Kartu Concertina Istimewa Untuk Emily
Si sulung, Emily, mau berulang tahun ke-14 minggu lalu. Layaknya di tahun-tahun sebelumnya, saya membuatkan dia kartu ucapan. Kebiasaan ini sudah saya kerjakan beberapa tahun, tapi saya lupa kapan pastinya. Dulu waktu saya kecil, mendiang mama suka membuatkan saya kartu ucapan ulang tahun sederhana. Beliau akan menggambar bunga dengan pulpen, lalu mewarnainya dengan pensil warna. Lalu beliau menuliskan tulisan "Selamat HUT ke-..." memakai huruf Romawi, buat saya. Sayangnya, kartu-kartu yang sangat berkesan itu hilang entah keman, karena keluarga saya dulu kerap berpindah rumah. Tapi saya masih ingat kebiasaan mama itu dan ingin meneruskannya untuk anak-anak.
Kali ini, untuk kartu ulang tahun Emily, saya membuat kartu dengan dasar concertina atau berbentuk mirip akordion. Saya ingin mengisinya dengan harapan-harapan saya dan bagaimana dia di mata saya. Beberapa hal yang Emily sukai, saya pakai di dalam kartunya, biola dan macaroon. Kebetulan sewaktu kami jalan-jalan ke New York, kami mampi rke toko kertas Paper Source. Di situ saya melihat ada sticker berupa macaroon dan langsung membelinya untuk kartu Emily. Kertas dasar kartunya sendiri adalah karton biasa, berwarna kuning. Nuansa warna yang saya padukan adalah merah muda, hijau, dan hijau. Ada empat halaman di kartunya, dengan bonus halaman terakhir, khusus untuk memberikan pernyataan kartu itu untuk siapa. Kartu ini saya ikutkan kegiatan Prakarya Kertas yang saya prakarsai lewat group Prakarya Kertas di Facebook.
Wednesday, February 13, 2013
Scrapbook: Enam Tahun Kemudian
Kenangan masa kecil anak-anak banyak sekali tersimpan dalam bentuk photo. Mencermati photo demi photo dari waktu ke waktu, rasanya ribuan kenangan muncul di kepala. Asyiknya diapakan photo-photo ketiga anak saya ini ya? Ada dua photo yang ternyata jaraknya tepat enam tahun berselang, diambil pada tahun 2006 dan 2012. Posisi ketiga anak saya pun sama, berjajar layaknya anak tangga, dari yang bungsu sampai yang tertua. Saya akhirnya membuatkan dua halaman scrapbook yang bersisian dan seakan bercerita mengenai perkembangan anak-anak selama enam tahun itu. Proyek terbaru ini masih dalam wujud pendayagunaan katalog barang menjadi album scrapbook. Tema scrapbooknya minimalis, dengan kedekatan motif yang bertautan satu sama lain.
Tuesday, September 25, 2012
More of Old Calendar Scrapbook
I've finished my latest project turning old calendar into a scrapbook album and I LOVE IT! I found it very interesting and addicted, coloring the calendar pages with ink stamps. I combined 2 or 3 colors on a page to create the color nuances of Autumn. My scrapbook theme is AUTUMN IN CONNECTICUT. I took the pictures during Autumn in 2010 and 2011 in several places in Connecticut. It's always lovely when Autumn arrives in New England. New England is an area in the eastern of United States that consists of several states, including Connecticut. This area is famous during Autumn for its colorful foliage. The earlier scrapbook pages have been posted here, OLD CALENDAR SCRAPBOOK and the additional pages you can view below. I will post more of the tutorial to turn old calendar into a scrapbook album later.
Wednesday, September 12, 2012
Altered Calendar Tutorial
As I promised you on my recent post about OLD CALENDAR SCRAPBOOK, I will describe the materials I used and how to make an altered calendar. First of all, because I used a small hanging calendar or if you want to use a desk calendar that is usually small, make sure the size of your photos is adequate. I printed some photos in 4inches x 6inches and the rests are in wallet size. Since the theme of this scrapbook album is Fall, I use a lot of colors that are in Fall gradation: dark and light brown, terra cotta, yellow, and green. I also used maple leaf paper punch to create a stencil when I decorated the paper. I chose the technique called inking to color the pages with arrays of fall-theme ink stamps. Here are the details of materials and the directions on how to create an altered calendar.
MATERIALS:
- Old calendar (mini or desk calendar)
- Wallet size photos or any other suitable size
- Ink stamps (I prefer using distress and archival ink)
- Make up sponges, each for different ink color
- Maple leaf paper punch (use the punch-out for decoration and the left-over paper for stencil)
- Scrap papers
- Specialty ribbon (with words)
- Sticker and other types of decorations
- 3dimentional foam tape
- White or light color cardstock
HOW TO CREATE PAGE 1:
- With a make up sponge, dab lightly and smoothen out evently the ink stamp unto the calendar page. For the first page of the scrapbook, I used Adirondack earthtones ink in butterscotch color.
- Then using a maple leaf punch-out, cover parts of the inked page and dab the dark ink color to create the leaves imprints.
- Color the maple leaf punch-outs with the same ink color ( I used StazOn timber brown) as the one you used to make the leaves imprints. Set aside for decorations.
- Adhere the photo unto white cardstock and place it on the page.
- Decorate with strips of scrap papers and decorative ribbon.
- Then adhere 3D foam tape on some of the maple leaves and place them on the photo, and adhere the rests on the other part of the page.
Old Calendar Scrapbook
My latest scrapbooking project involves an old calendar. I keep several of old calendars that are very good. Because I love buying calendars especially illustrated with paintings or drawings. Like the one with Charles Wysocki's paintings or Mary Engelbert's. Last year I came upon calendar with paintings by Ellen Eilers called Life in Calico Country and right away fell in love with it. But after one year has passed, I don't want to throw away such a beautiful calendar. So instead I use the mini calendar as an album for my scrapbook project called FALL IN CONNECTICUT, therefore I can still enjoy Ellen Eiler's artworks too. I've created several pages already and will post them below. I will describe the details about the materials and directions later on. By the way, this is one excellent way to reuse an old calendar to turn it into a scrapbook album. This way, if you use a desk calendar or a sturdy mini calendar like mine, you can show off your scrapbook album on a table and change the page each month just like a calendar.
Sunday, August 26, 2012
Prakarya Kertas: Membuat Buku Mini
Buku
mini ini terbuat dari selembar kertas. Ya, benar-benar hanya dari
selembar kertas. Kertas yang saya pakai bentuknya persegi panjang.
Ukurannya terserah, tapi usahakan yang mudah dibagi menjadi 4
panjangnya, misalnya berukuran 10cm x 20cm. Sudah beberapa kali saya
membuat buku mini ini untuk berbagai kesempatan. Untuk seorang kawan
yang sedang sakit, saya buat buku mini untuk rangkaian photo-photo bunga
dan puisi dari pujangga kesayangannya. Buku mini lainnya sebagai hadiah
untuk seorang kawan yang masih bertema sama, berisi photo-photo bunga
jepretan saya ditemani beberapa kata bijak. Buku mini ini juga berguna
untuk mengabadikan karya anak-anak. Seperti karya putri kedua saya
sewaktu dia masih kelas 2 SD. Suatu hari dia menggambar sebuah cerita
tentang "Mama's Favorite Things". Keharuan dan kebahagiaan saya akan
hasil karyanya saya jadikan illustrasi dalam buku mini ini.
Bagi kertas persegi panjang menjadi 8 bagian, beri penegasan garis antaranya.
Potong kertasnya di bagian tengah, tapi jangan sampai putus.
Lipat dan pertemukan bagian yang tidak terputus, lalu rekatkan.
Kemudian rekatkan bagian halaman lain yang bertemu juga.
Beri sampul, dengan menempelkan kertas bermotif atau beri hiasan lain.
Tempelkan gambar, photo atau tulisan sebagai jurnal dalam bukunya.
Friday, June 29, 2012
Mini Scrapbook Album: Springtime in Rumi's Words
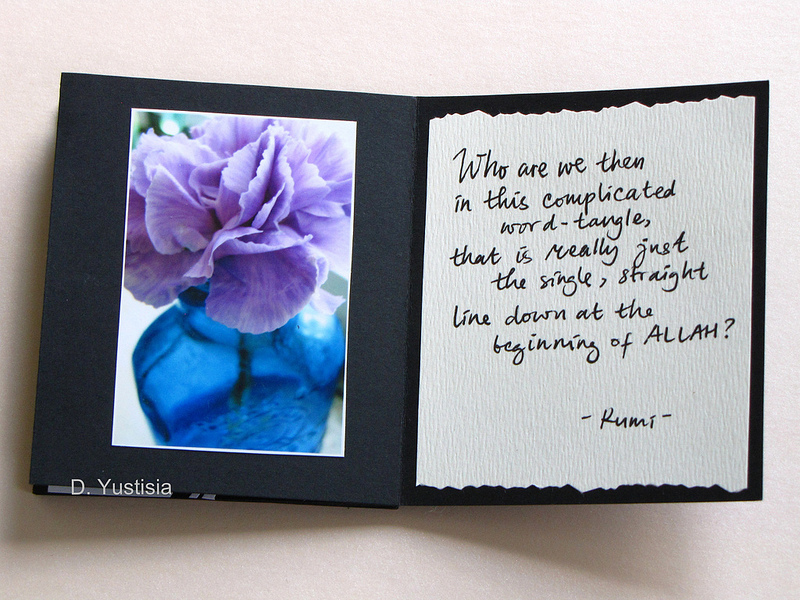
A long while ago, I posted a picture with words from a poem by Rumi on my other blog. A friend told me that she loves Rumi. From then on, I was curious about this magnificent poet. I bought a book of Rumi's poems and I was engulfed in his words. Then one day I got a terrible news that my friend, the one who loves Rumi, got ill. I was sad and wanted to visit her. Unfortunately, we live thousands of miles apart. Because I couldn't come to see her and give her some flowers to cheer her up, I made this mini scrapbook album instead.
The album was made out of one piece of paper. I will post how to create it later. I used my own photographs for the pages in the album and chose Rumi's poem about Spring for the theme, also picked out some phrases that have similar ambiance. I always loved making this mini scrapbook album. Especially because I get to use the pictures I took of flowers and pair them with beautiful words from my favorite quotes or poems. The pictures that I used were wallet size. Other decorations and accents were some stickers and cut-outs.

The album was made out of one piece of paper. I will post how to create it later. I used my own photographs for the pages in the album and chose Rumi's poem about Spring for the theme, also picked out some phrases that have similar ambiance. I always loved making this mini scrapbook album. Especially because I get to use the pictures I took of flowers and pair them with beautiful words from my favorite quotes or poems. The pictures that I used were wallet size. Other decorations and accents were some stickers and cut-outs.

Subscribe to:
Posts (Atom)